How to Make an Alarm Stop and Start Again Gml
GameMaker Language – Beginner's Guide
Contents:
- Introduction
- Events
- Variables
- Functions
- Conditions – if Statements
- Conditions and Functions
- Conditions – switch Statements
- The repeat function
- The while Loop
- The do…while Loop
- The do…until Loop
- The for Loop
- Arrays
- Conclusion
Introduction
Welcome! This tutorial is aimed at beginners who have little to no experience in GML or programming in general. It will introduce you to the basics of programming and how GML works. After this tutorial, you'll be able to use GML to build your own games effectively!
Bookmark this page now (Press CTRL + D) as this guide is quite long and you will need to close it and come back later. Kudos if you can read it all in one go!
Click here to read the Russian translation of this guide, by Artem Darkov.
Events
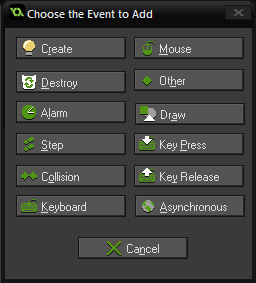
You put code inside an event, and when that code runs depends on the type of event you put it in. There are a lot of events to choose from in GameMaker.
Here's a quick introduction to the events we'll be using the most:
Create
Code inside the Create event is executed only once: when the instance running the code is first created. Here you can initialize most of the stuff related to your instance.
Step
The most important and the most used event – the Step event runs every step – if your game/room speed is set to 30, a Step event will run 30 times in a second. This is used for things you want to keep on happening.
Draw
This event is used to execute the draw codes. For example, functions like draw_sprite, which is used to draw a sprite at a location, or draw_rectangle, which is used to draw a rectangle, only work in the Draw event. The Draw event overrides the default draw of the instance, meaning your instance won't be drawn unless you use draw_self().
Alarms
Alarm events run after you set them. So if I set Alarm 0 to 60 in the Create event, the code inside the Alarm 0 event will run after 60 steps.
Collision
While adding a collision event, you can select an object to create the event. That event will only run when the instance running the code collides with any instance of the object specified while creating the collision event.
Read more about events
Variables
Variables are containers that contain some value/information. They have a name. For example, a variable named player_health may contain 100, or a variable named player_name may contain the player's name ("Peter", "Lindsey", etc.). It's up to you what you want to name your variables and what you want to store inside them.
A variable in GML can store:
- Numerical values – 100, 45.534, -42.2
- String values – "Teacher", "Peter"
- Boolean values – true or false
Example:
Initialization:
price = 20;
Here we have initialized a variable named price which contains 20 as a value. If the variable has already been initialized before, this serves to change its value to 20.
Side note: It is not required in GML to put a semicolon (;) after each statement. So feel free to skip it and focus on the main code.
There are many ways of assigning a value…
price = 4 * 5; price = 40 / 2;
To increase the value…
price += 20;
To decrease the value…
price -= 20;
To multiply, or to divide…
price *= 2; price /= 2;
Use:
You can also use variables in mathematical expressions…
a = 4; b = 5; c = a + b;
Here, c would store 9 because of the expression a + b (which means 4 + 5 as a is 4 and b is 5).
Different Types of Variables
Local Variables
These variables are the ones initialized with the var keyword. They are discarded when the event they were initialized in ends. They can only be used inside that event only, unless initialized again.
var price = 2;
This initializes a local variable called price. Suppose the event this code was in were the Step event; then the variable could only be used inside the Step event. If you try to use it without initializing it in another event, it would return an error as it doesn't exist there.
Instance Variables
These are normal variables which are initialized by assigning a value.
price = 20;
These kinds of variables can be accessed inside all the events of the object/instance it was initialized in after it has been initialized.
Global Variables
These are variables which can be accessed by all the objects in your game – hence the name "global". There are two ways of creating such variables:
Initializing with the globalvar keyword…
globalvar price; price = 2;
Once the variable has been initialized with the globalvar keyword, it can be used by any instance present in the room.
or use with global. prefix…
global.price = 2;
This way you don't have to initialize it with the globalvar keyword but have to use the global. prefix every time you want to use this variable.
Built-In Variables
There are also some built-in variables which mean something special in GameMaker. Here are a few examples…
Built-in Instance Variables
These are the built-in variables which are unique to each instance. They can also be known as properties of an instance. Here are a few important examples…
x: horizontal location of the instance inside the room (in pixels) y: vertical location of the instance inside the room (in pixels) speed: speed of the instance (in pixels per step) direction: the direction the instance moves towards (in degrees), default: 0 hspeed: horizontal speed (in pixels/step) vspeed: vertical speed (in pixels/step) image_angle: the rotation of the sprite (in degrees), default: 0 image_xscale: horizontal scaling of the sprite, default: 1 image_yscale: vertical scaling of the sprite, default: 1 image_index: the sub-image of the sprite the instance is showing image_speed: the speed at which the sprite animates through its sub-images sprite_index: the sprite used by the instance
You can modify or use these variables just like ordinary ones.
//change location to 200, 150 x = 200; y = 150; //make sprite 2x bigger image_xscale = 2; image_yscale = 2; //rotate sprite half-way around image_angle = 180;
Text that comes after // is a comment. It has no effect on code; it's there so that you can explain what your code does or write important things you'd like to remember when looking at your code.
You can write multi-line comments also – just start them with /* and end with */.
Built-in Global Variables
These are the built-in variables which are global in scope and same for each instance.
Here are a few examples…
room_speed: the number of steps run by a room in one second, default: 30 score: the score in your game, can store any numerical value though health: your player's health, can store any numerical value as well lives: number of lives, can store any numerical value as well
Here is a list of all the built-in variables in GameMaker.
Functions
Functions perform an action and/or return a value based on the arguments provided in the parentheses that come after the function name. If the function is supposed to just perform an action, it is written like…
function(arg0, arg1, arg2...);
…but if it also returns something after performing the action and you want to store it in a variable, you do it like…
variable = function(arg0, arg1, arg2...);
A function may or may not require arguments.
Here are a few examples…
instance_create_layer(x, y, layer, object); What it does: Creates an instance of object at position x,y inside layer instance_create_layer(48, 48, "Instances", obj_enemy); What it returns: The instance id of the instance created enemy_id = instance_create_layer(48, 48, "Instances", obj_enemy); draw_sprite(sprite, sub-image, x, y); What it does: Draws sprite 's sub-image at position x,y draw_sprite(spr_ball, 0, x+5, y+5); Returns nothing. random(number); Does nothing. What it returns: Returns a random real number between 0 and number . speed = random(5);
Conditions – if Statements
Conditions are used to control the execution of some code. Using conditions you can control whether or not a piece of code runs based on conditions. if statements are the most commonly used conditions. Using if you can ensure that a piece of code runs only when a condition or a set of conditions is true.
Example
Say you're making a game, and you make a shop. Here, the player has to buy some upgrades. The first upgrade is a weapon upgrade. It costs 200 coins. So the player can only buy it if that condition is satisfied – that is, if they have at least 200 coins. For such a case, we can use the if condition:
if (coins>=200){ //buy upgrade } The > sign opens up to the side that is greater, and of course = means equal. So, by checking if coins>=200, we're checking if the coins are greater than or equal to 200.
So, the player can only buy the upgrade if they have enough coins. But what if they don't? We need to notify them that they need to get more coins. But that should only be specified when the condition is not satisfied. For that, we use else.
if (coins>=200){ //buy upgrade } else{ //notify, not enough coins } The code after else runs only when the preceding if condition has returned false. So if the player has less than 200 coins, they will be notified.
You can also put a condition after the else part, so that even after the former condition has returned false, it would require another condition for the code after else to execute.
This way you can add more else keywords and add different code for different conditions:
if (condition0){ //code0 } else if (condition1){ //code1 } else if (condition2){ //code2 } else{ //code3 } If condition0 is true, code0 will run, and the rest of the if statement will be skipped. But if condition0 is false, it will move on to condition1. If it's true, it'll execute code1 and stop. But if it's false too, then it'll move to condition2. If it's true, code2 will run, but if not, the if statement will finally move on to the last else part and seeing that there's no condition, execute code3.
Usage
In the previous example we checked if the coins were greater than or equal to 200. But the conditions can be used in many more ways.
Checking an equal value: if (money==400) For this condition to be true, money has to be exactly 400. Checking a smaller value: if (money<50) For this condition to be true, money has to smaller than 50 (at most 49.99..) Checking if something is not equal: if (name!="CURSE") If the player's name is CURSE, this condition will return false. So for this condition to work, something should not be equal to a value. Another example: if (lives!=3) True only if lives are not 3. Checking a boolean is true: if (paused==true) OR if (paused) True only when a variable is true, here "paused". You can skip the "==true" part and just type the variable name to check if it's true. Checking a boolean is false: if (paused==false) OR if (!paused) True when the variable specified is false. Exclamation mark (!) can be used as a prefix for a condition to flip it. So if the condition is false, it would return true.
Conditions and Functions
Functions can be used inside conditions too. They can either be checked for as booleans (returning true or false) or returning some specific value (number/string).
Here are a few examples to demonstrate how functions can be used inside conditions.
place_meeting()
The function place_meeting() can be used to check if there is a collision between the instance running the code and a specified object/instance at a position. For example,
code inside obj_player: place_meeting(x, y, obj_wall);
This function would return true if obj_wall was colliding with obj_player at the latter's position. So to check for collisions and execute some code, you would put this function into a condition:
obj_player Step event: if (place_meeting(x, y, obj_wall)){ speed = 0; } When there's a collision detected between obj_wall and obj_player at the player's location, it sets it's speed to 0.
instance_exists()
It returns true if an instance of a specified object is present within the room.
Step event: if (instance_exists(obj_player)){ score += 1; } The above code checks if an instance of obj_player exists in the room, and if it does, adds 1 to the score.
floor()
It floors a number specified inside its parentheses and returns the result. For example, 4.94 would become 4, 1.13 would become 1, and so on.
if (floor(image_index)==2){ image_index = 10; } image_index stores the index of the sub-image the sprite is currently on. Sub-images are in integers, but the variable image_index is not. So before checking what sub-image the instance is on, you need to floor the variable.
Conditions – switch Statements
As a beginner, switch statements probably won't be of much use to you, but still, you should know about them.
In a switch statement, you first specify a variable, a function or a combination of those inside a mathematical expression. Then you list all the possible results. The switch statement evaluates the expression specified and moves to the case that matches with the outcome. It executes the code following the case until a break is found.
Here's an example:
switch(level){ case 1: level_name = "Overworld"; break; case 2: level_name = "Underground"; break; case 3: level_name = "Water World"; break; case 4: level_name = "Castle"; break; default: level_name = "Unknown"; } In this example, level is a variable that contains the level number the player is currently on. When level is 1, the switch will move to case 1. It will run the code, where it sets level_name to "Overworld". Then it encounters a break and stops the code.
If you don't use a break before starting another case, it will keep executing all the cases until a break is found.
Similarly, when level is 2, case 2 will run. Same for case 3 and 4.
But what if level matches none of these cases? In such a situation, the switch will move over to the default part, and run the code after it.
The repeat function
The repeat() function can repeat a set of statements a specified number of times and is used in the same way as an if statement. Here's an example:
repeat(5){ coins += 1; } You know what coins += 1 does: it adds 1 to the variable coins. But since we're using repeat(5) before it, the statement will be executed 5 times, ultimately adding 5 to the variable coins(1 * 5 = 5).
The repeat() function is a kind of loop, because it keeps looping until it meets an end. Keep reading to know more about loops.
The while Loop
So to start off – there are different kinds of loops and the while loop is just one of them. Since it's the simplest one, I'll be explaining it first.
Loops are called so because they have the ability to loop. Loops are just like the if statement, as in they have a condition that needs to be fulfilled for the code following the condition to be executed. Here, have a look at an if statement compared to a similarwhile loop:
if (money > 40){ //code } while (money > 40){ //code } The if statement checks if money is greater than 40, then executes the following code. The while loop too checks the same thing, but the difference is in how loops work.
When the condition specified for a loop becomes true, the code following it is executed, and when that code block ends, it goes back to the condition and checks it again. If it's true, then it again executes the code. Then back again and if it's true, again executes the code. It keeps on doing so and looping through the condition and then the code until the condition turns false.
Let's take the example above. Say the value of money becomes greater than 40. The while loop will execute the code following it, and keep on doing so until it turns false. So for the condition to turn false, the value of money needs to go below or equal to 40.
while (money > 40){ //code money -= 1; } Now that's right. If we're reducing the value of money by one each loop, at one point it's bound to go below 40 and stop the loop.
So, it's required that you implement a way of eventually making the condition false and make the loop stop. If you don't, it'll become an infinite loop that'll never stop, and will crash your game.
The do…while Loop
This is another loop and a variant of the while loop. Have a look at how it looks before I can explain it:
do{ //code } while (condition); No no, don't be confused. It's really simple.
Remember how in the while loop we used to check for a condition before executing the code?
while (condition){ //code } In the do…while loop, the while (condition) part has just moved to the bottom, after the code block has ended, and has been replaced by the keyword do:
while (condition)do{ //code } while (condition);
This is done because the do..while loop first executes all the code that is in the code block, and then checks for the condition to see if it's true and if it should loop again. If it is, it goes back to the top and executes the code block. Then again comes to the condition. This way it keeps looping until the condition turns false, the difference being that it first executes the code block without even checking for a condition.
There should be a semicolon (;) at the end of a do…while loop because without one, the ending while (condition) part can get confused for the starting of another while loop.
The do…until Loop
The do…until loop is the same as the do…while loop, the difference being that the condition check in do…until is flipped. So in do…while, the loop would run again if the condition were true, but in do…until, the loop would only run if the condition were false.
Here's an example:
coins = 5; do{ coins++; }until (coins==10); It's as simple as saying it: "keep adding 1 to coins until they are equal to 10". So this would keep on adding 1 to coins and when the condition given becomes true, which means the coins become equal to 10, the loop would break.
In GameMaker, you can only use do…until and not do…while.
The for Loop
The for loop is just like the while loop, as it checks for a condition first and then keeps looping the code until the condition turns false. But it has some more features. Have a look at its syntax:
for(init; condition; increment){ //code } There, you can spot the condition in the middle. But what's all that other stuff?
It's basically for a loop variable. A loop variable in a for loop is a variable that determines how many times the loop will run. More explanation coming up.
init is where you initialize your loop variable, as in give it a name and a value. Runs only on the first loop.
condition is the condition that will determine if the loop is run.
increment is where you set the loop variable to be increased or decreased by a certain value each loop. Runs at the end of the loop.
for(i=0; i<3; i++){ //code } Here's a detailed explanation of how this loop will go:
So first I'm initializing the loop variable i at 0 value. Then there's this condition checking if i is smaller than 3. Because it is, which means the condition is true, the code will run. Once the code block has completed execution, the increment part will run: meaning that i will be increase by 1 (i++).
Now, the code block has completed its run and i has been increased by 1, which means it's 1 now (0 + 1). The initialization part will be left because it only runs on the first loop. So it will move on to the condition and check if i is smaller than 3. Because 1 is smaller than 3, the condition will become true and the code will be executed.
Again, after executing the code block, 1 will be added to i, making it 2. Then it'll move on to the condition, and because 2 is smaller than 3, the condition will become true and the code will be executed again. Then i will become 3 (2 + 1), and then the condition will become false because i is not smaller than 3, it's equal to it. So the loop will stop.
So, the loop will run 3 times:
1st loop: i is 0. i<3 = true, runs. i++. 2nd loop: i is 1. i<3 = true, runs. i++. 3rd loop: i is 2. i<3 = true, runs. i++. 4th loop: i is 3. i<3 = false, doesn't run.
If you didn't grasp all of this, reading it a second time might help.
Here's another example of a for loop:
for(i=3; i>0; i--){ //code } This one starts at 3 and keeps decreasing by 1 until it's no more greater than 0. Can you calculate how many times it will run? Do so and post your answer in the comments!
Arrays
Remember how variables worked? You could give them a name and store some value…
coins = 10;
That's the amount of coins for one player. But what if there are 4 players and you have store the amount of coins they each have? How would you do it?
coins0 = 10; coins1 = 5; coins2 = 12; coins3 = 7;
Like that, right? Storing all those values in different variables? That would work right, but there is another, better way of doing this: using arrays.
coins[0] = 10; coins[1] = 5; coins[2] = 12; coins[3] = 7;
Arrays are just like variables, as in they have a name and store some value, but unlike variables, they can actually store more than one variables (elements) under the same name.
To assign or access an element inside an array, you put the element id (a number) inside square brackets after the array name. Like this:
array[id] = value; variable = array[id];
So in the previous example, I added four elements (0, 1, 2, 3) to the array coins. If I want to store the second element (with the value 5) in a variable called player_2, I'll do this:
player_2 = coins[1];
You can also use a variable in place of the element id inside the square brackets, because what matters is the value, not the keyword. So I can also do this like:
i = 1; player_2 = coins[i];
This way, you can also use arrays inside a loop:
for(i=0; i<3; i++){ money[i] = coins[i]; } The above code performs the same function as the following one:
money[0] = coins[0]; money[1] = coins[1]; money[2] = coins[2];
Because the loop will only run 3 times when the loop variable i is 0, 1 and 2 respectively, the first three elements of the array money will become equal to the first three elements of the array coins.
Conclusion
That's all for the basics. To learn more amazing things that you can do in GML, look at all the tutorials I have on this website.
If you want to learn making your own games in GameMaker Studio 2 through a video course, check out my new course on Udemy.
Got anything to ask, or any suggestions to give? Feel free to comment below. I'll respond to your comment as soon as I can!
For more help, join our Discord server here (no sign-up required). We can help you with anything and teach you GML if you couldn't grasp something.
See you, and happy dev'ing!
Source: https://gdpalace.wordpress.com/learn-gml/
Postar um comentário for "How to Make an Alarm Stop and Start Again Gml"